Bring Sims 4 models to Tower Unite
(Last updated 2023-08-08)
This guide will explain how to extract, rig, fix, and export a Sims 4 model for use in Tower Unite. Much of the process can be used for other models as well.
I won't be explaining the absolute basics of Blender, such as how to rotate/pan the view and navigate the interface, as the guide would end up 4 times as long. For that, you should check out at least one of these videos:
I know, they're about 15 minutes long "oh nooo" - trust me, you'll save yourself 15 hours of pain by watching them.
With the basics down, even if you are not used to Blender, I will attempt to explain as much as possible. However, it's a fairly technical program, and it's really easy to make mistakes in it. Saving often, and to different files, is a good idea. I usually end up with at least 5 "WIP" saves on each model I rig, for safety.
There's also a glossary of terms at the bottom of the page. If you're ever unsure of what I mean when I mention things like "mesh" or "normals", check there.
Prerequisites:
- Latest version of Blender (2.8 at the earliest)
- The Tower Unite Blender Suite (Get the 1.2.4 version if using Blender 3.0 or later)
- Latest version of the Sims 4 to TU converter addon for Blender. (Install instructions are further below)
- An installed copy of the latest version of The Sims 4
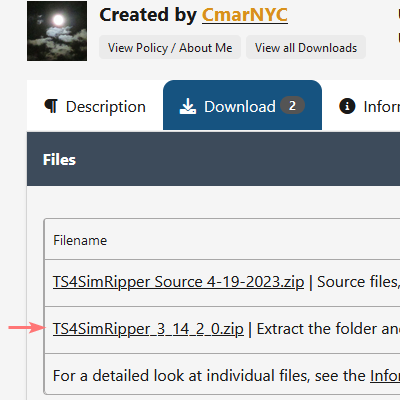
- Latest version of the TS4 SimRipper tool by CmarNYC (Under Download, get the non-source version. Click here to see what I mean.)
TS4 SimRipper
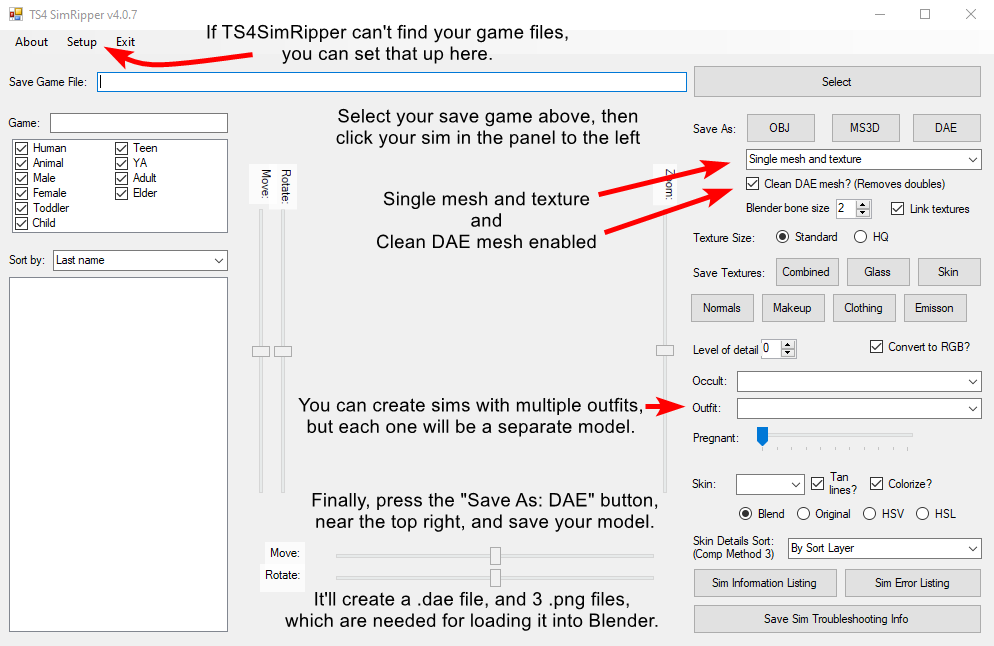
The SimRipper tool, shown here, lets you look through your Sims 4 savegame (you made one, right?) and extract the character models from it.
The first time you run it, it will attempt to find your installed copy of The Sims 4. If it fails, you can set it up in the Setup menu in the SimRipper.
The settings shown in the image are the settings you should use when extracting the models. You can click the image to see it in full resolution.
However, if you prefer the instructions in text, here you go:
- Open TS4 SimRipper, and select your Sims 4 save file via the top right "Select" button. Character names should appear in the list on the left.
- Select your character in the list on the left. They should now be visible in the center of the screen.
- Slightly below that "Select" button, there's a dropdown menu. Set it to "Single mesh and texture".
- Right below that dropdown, make sure "Clean DAE mesh?" is enabled.
- Optionally, set "Blender bone size" to 9. This'll help a bit later, but it's not required.
- Also optionally, setting "Texture Size" to "HQ" will double the resolution of the character textures. It can make them look a bit nicer, at the cost of a larger filesize.
Also, Sims 4 gets a lot of updates still. Some of these updates break the SimRipper tool, though it's usually fixed quickly. Make sure to always use the latest version of both. (Sorry, pirates.)
Installing the Blender addons
There are two Blender addons that you'll need to follow this guide. Both are going to be in .zip files, which you'll load into Blender.
The first, and most important, is the Tower Unite Blender Suite. If you're using Blender 3.0 or later, get the v1.2.4 hotfix version of the addon. Otherwise, get v1.2.3.
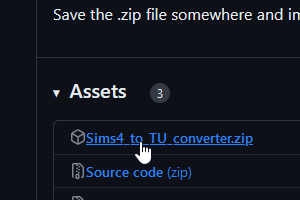
The second addon (made by me, wow!) will save you roughly 30 minutes later. Grab the latest version here.
Next, open Blender. In the top left, go to
Edit -> Preferences -> Addons
and press the Install button in the top right.
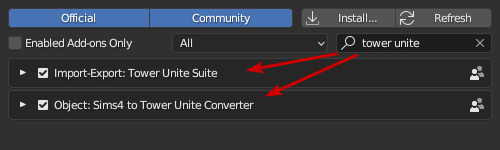
It'll open the file browser, where you can select the .zip files you downloaded.
Very importantly, make sure to enable the addons afterwards. You can search for "Tower Unite" in the little search field below the Install button. Make sure both addons are ticked.
Useful Blender settings
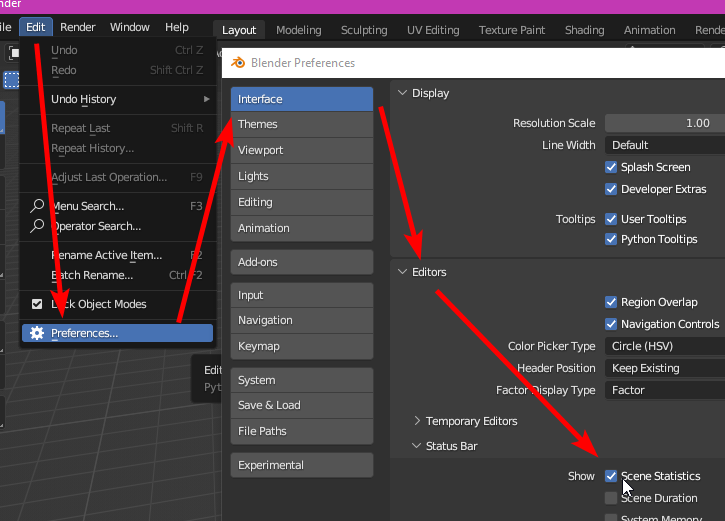
Tower Unite has a hard limit of 30,000 vertices per model. Some Sims 4 characters risk going over this limit, especially with modded hair, jewelry, and clothing.
There's a setting in Blender which lets you see the vertex count of your model.
It is disabled by default, but can be enabled by going to:
Edit -> Preferences -> Interface -> Editors -> Status Bar -> Show Scene Statistics
However, when importing the character into Tower Unite, more vertices are added to the model. You should assume that if Blender says you're close to the limit, you're likely already over it.
(Apparently it's due to a quirk of how Unreal Engine, or the Tower Unite import tool for it at least, imports the model. Don't expect it to be fixed.)
Blender - Import, Rig, and Export
This whole section is meant to be followed from start to end.
If you haven't already, open Blender in the default, General scene.
Import model
- Delete the default cube, light, and camera, by selecting them and pressing X. (You can select things by clicking them either in the 3D viewport, or in the Outliner in the top right.)
- In the top left, click File -> Import -> Collada (.dae). Use the model file you exported from the SimRipper.
- A Lamp object also got imported. Click the Lamp and press X to delete it.
You should now see your character in the 3D viewport, as well as some dots or spikes around it. Those are the bones, and we'll be using those in the next section.
Pose the model to line up with the TU rig
The Sims 4 rig and the Tower Unite rig's default poses are slightly different. In the Tower Unite rig, the arms are rotated a bit further back, by about 5 degrees. Let's fix that.
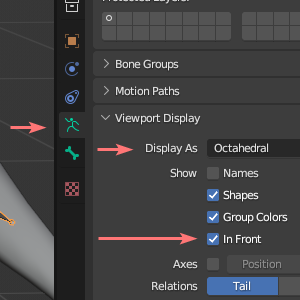
- Make sure you have the "rig" object selected.
- In the Object tab, under Viewport Display, make sure "In Front" is checked. This'll help us see the bones through the mesh.
- If the bones are very small and hard to see, you can also change the "Display As" setting to whatever you prefer. (This is where it's helpful to have set the Blender Bone Size to 9 in the SimRipper.)
Finally, go to the Modifiers tab for the mesh, and Apply the Armature modifier. It'll vanish from the list, and your character's "default" pose will now be the one you just posed them into.
The Sims 4 armature, called "rig" here, is no longer needed. Ensure you're in Object mode, select it, and press X to delete it.
Rigging the model to the Tower Unite armature
todo
Fix the vertex groups
At this point, we'd usually have to manually rename and merge a bunch of vertex groups together. This process takes 15-30 minutes and is really easy to mess up, so I wrote a script to automate it. You've hopefully already installed and enabled it. (if not, instructions are further up)
Hover your cursor over the 3D viewport and press the N key. This should pop out the sidebar. In there is a tab that says "Sims 4". Open it.
(If the Sims 4 tab isn't there, and you only see "Item", "Tool", "View" and "Edit", you forgot to enable the addon.)
Now, make sure you're in Object mode, select your character's mesh (NOT the armature) and press the "Fix Vertex Groups" button. If it says "SUCCESS" at the bottom of the screen, we should be done with this step.
If your model was imported with multiple meshes, you'll have to do this for each one. However, there's a chance that these multiple meshes will be missing vertex groups that the addon relies on. If that's the case, you'll have to manually rename those vertex groups. Typically this only happens with hair and glasses, so it's only a little extra work.
Export the model
todo
Tower Unite - Import and Upload
todo
Fixing common issues
Your model should now be good enough to use in Tower Unite, but there might still be some issues with it. Here's how to fix the ones I've found.
Too many vertices?
If Tower Unite complains that your model exceeds the vertex limit, then you may have to start manually cleaning the model up. This can mean deleting some parts of the model, or merging vertices together.
The Sims 4 characters have an issue when they get extracted from the SimRipper. For whatever reason, they're covered in duplicate vertices. These are two or more vertices that are in the exact same place. In Blender, it might look fine, but it can actually cause some issues with shading the character.
TODO: explain how fix
Character is a circular monster in Tower Unite
You imported the character into Tower Unite, and everything seemed to go fine, except your character has turned into a donut.
This is usually caused by forgetting to Apply Scale on your character in Blender.
In Blender, enter Object mode, click your character mesh, and press:
Ctrl-A -> Apply Scale
From there, re-export the model and re-import it into Tower Unite. If it doesn't work the first time, try again - sometimes it refuses to refresh what you see on the screen.
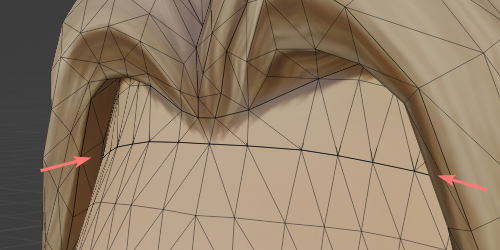
Random bits are stretchy and stuck in place when animated
There's droopy bits under the chin
Note: This part assumes you've already renamed the vertex groups to the Tower Unite names. (head, neck_01, etc.)
I don't know why, but Tower Unite loves to over-animate a particular set of vertices under the chin.
To fix this, select the area shown in the image here
TODO ADD IMAGE
and set the weight for the head to 1 and the weight for the neck to 0.
TODO write better
The hair/clothing has oddly sharp shading
Extracting models from Sims 4 often leaves bits weirdly disconnected. This shows up most often on long hair.
To fix this, you need to understand that Sims 4 hair is initially made of thick, pointed "tubes" of hair.

Here you can see one such tube that was split apart by the SimRipper. Those disconnected edges will show up as hard edges on the model's shading.
To fix it, you should select all the parts that are supposed to be connected, and press M -> Merge By Distance.
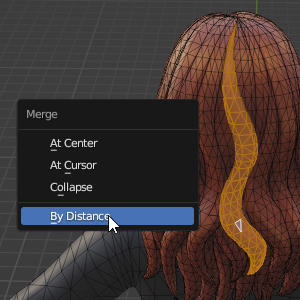
Now this part of the hair will look nice. The same process will usually work for any part of the model, including clothing.
Hint: You can quickly select linked parts of the mesh by hovering over them with the cursor and pressing L, to "Select Linked".
You should keep in mind that some parts of the model are intentionally disconnected, in order to force a hard edge. This is why the hair strands aren't all merged together as one big blob, it would flatten their shading a lot. But it's up to you.
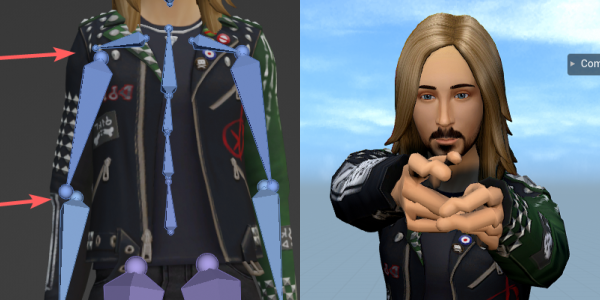
The clothing/hair/jewelry is all jagged
For whatever reason, Tower Unite sometimes over-animates vertices that have several vertex groups. This usually isn't visible in Blender; you'll have to import the character to TU to see the effect.
When in-game, the vertex groups compete incorrectly for influence over each vertex, and the vertices end up in spots they're not supposed to.
Sometimes, you can fix this by selecting the problem area in Edit mode, and pressing:
Mesh -> Weights -> Limit Total
Set the limit to 3, or 2 if that's not enough.
You may also need to do it twice for anything to happen. For whatever reason, Blender doesn't always apply it properly the first time.
Don't do it to your entire mesh at once, as things like the hair and pelvis need at least 3 vertex groups to be animated properly.
(I would deeply appreciate a better, more reliable way to solve this issue, if anyone has any ideas!)
Parts of the model turn invisible in Tower Unite
Most likely, the face normals are facing the wrong way. Games don't typically render backfaces (the backside of a face) in order to save on rendering time.
Adding the normal map
Did you notice that the character exported with 3 texture files alongside it?
So far we've only used one of them, the diffuse texture, for color.
Another of them is the normal map, a 2D texture that's used to help add some more depth and detail to the character.
It's not required, but sometimes it can help make the character look less flat.

To add it, follow these steps:
- Select the character mesh, and go to the Materials tab.
- Scroll down to where it says "Normal" and click the field next to it.
- In the popup that shows up, under "Vector", select "Normal Map". Some new fields will show up under the Normal section now.
- Click the yellow circle next to "Color", then select "Image Texture". More fields will appear.
- Under the new image texture, click Open, and navigate to where you saved your model. Find the file ending in _normalmap.png and click that.
- Finally, there's a "Color Space" field under the texture. Set it to "Non-Color".
Here's an example of what it should look like in the end:

Update the model after uploading it
You've uploaded your character to the workshop, and you realize you made a mistake. Is it time to delete it and re-upload it?
No! Actually, that's even against the workshop rules, and you can get banned for it.
Tower Unite already has a way to update your models and their metadata, after you've uploaded them.
To update metadata
- Enter the Tower Unite Workshop Editor.
- Go to the "My Imports" tab.
- Click the import file of the character, change the metadata as you wish, and press "Update".
- Now, go to the "My Uploads" tab and click your character upload.
- Under "Select File to Upload", select your imported file.
- Describe your changes, and press "Update".
Your character's metadata is now updated. You will need to clear your local workshop cache in the main menu, under
Settings -> Content -> Workshop Settings -> Clear Cache
to see the changes. You will also need to restart the game.
(Yeah, that last part sucks, but it's a known bug.)
To update the model itself
- Change the model however you want, and export the model from Blender as before.
- Import it into Tower Unite.
- Go to the "My Uploads" tab and click your character upload.
- Under "Select File to Upload", select your imported file.
(You can also simply overwrite your old imported file and use that.)
Unfixable issues (or very hard to fix)
Why are the arms/legs/fingers broken?
Tower Unite has a set of built-in animations that all player characters use. Every single one is animated poorly, with joints disconnected from each other. There is nothing you can do about this. Sorry.
You might think you can fix the fingers by just posing them more accurately, but it only barely helps, and they still look bad afterwards.
Niko's video guide contains a workaround for this, if it really bothers you. It's about 8 minutes in.
My character's jewelry or clothing is jagged and zig-zaggy
For whatever reason, Tower Unite often over-animates vertices that have multiple vertex groups. Essentially, the vertex groups compete for influence, and vertices end up in spots they're not supposed to.
Sometimes, you can fix this by selecting the problem area in Edit mode, and pressing:
Mesh -> Weights -> Limit Total
Set the limit to 3, or 2 if that's not enough.
You may also need to do it twice for anything to happen. For whatever reason, Blender doesn't always apply it the first time.
Don't do it to your entire mesh at once, as things like the hair and pelvis need at least 3 vertex groups to cleanly animate.
Weirdly shaded band on the forehead
Some hairstyles, typically the long hairstyles, have a weird "headband" added to them, to merge the hair more cleanly to the face.
From a distance, as it's viewed in The Sims 4, this doesn't matter. Up close in Tower Unite, it sometimes does.
I've found no reliable way to fix this. The geometry in that area can be super tricky to merge together. You're on your own.
For what it's worth, though, nobody ever seems to mind.
Final tips and tricks
Select linked/adjacent parts
You can select adjacent bits of the mesh by pressing Ctrl-Numpad Plus The regular Plus button will just zoom in, by default.
You can select all linked parts of the mesh by hovering over the area you wish to select from, and pressing L.
Hiding parts of the mesh
You can hide parts of the mesh that are in the way by selecting them and pressing H.
todo
Additional guides
Further guides can be found here:
- A great video guide by Niko on how to port any character to Tower Unite, provided they're already modeled and rigged.
- Official Tower Unite SDK pages - check out the Creating Characters page
- An early text guide with lots of screenshots, made by a friend of mine. They keep changing their name so they're hard to credit! Last I saw they went by GalaxyGothVT.
If there were any issues following this guide, you're encouraged to join the Tower Unite forums or Discord, where many active users are skilled in porting characters over.
Glossary
Some of the terms used can be a bit confusing or intimidating for beginners. Here's a list of some of them, and their meaning
Vertex - A single point in 3D space. A model is made up of many vertices. (plural term for vertex - pronounced "ver-tih-sees")
Edge - A line connecting two vertices together
Face - A flat plane between three or more faces.
Mesh - A collection of vertices, edges, and faces. A model can be made up of one or more meshes.
Model - The definition of model is a bit context-dependent. Sometimes people use it to mean the same as mesh, sometimes it's a collection of meshes, sometimes it's a mesh as well as its rig. To keep it simple, think of them as "mesh(es) plus whatever else is needed"
Armature/Rig - Both terms mean the same thing. It's a collection of "bones". Models use these in order to be posed and animated. In order for this to work, the model also needs vertex groups with the same name as the bones.
Vertex Group - A collection of vertices. These are used to tell the model which vertices to move when a bone is moved, and how much to move them by. Vertices can be part of multiple groups; for instance the knee might be grouped to both the upper and lower leg, flexing between them as the character moves.
Vertex Weight - Each vertex in a Vertex Group also has a Weight in that group. It's used to determine how much to move the vertex by when the corresponding bone moves. Ideally it's in the range of 0 to 1, where 0 means "don't move at all when the bone moves" and 1 means "follow the bone anywhere it goes". (You can even go beyond this range. A value of 2 would move twice as much as the bone. Some games will normalize this back to a range of 0-1, however.)
Normalize - Take a number in a range of 0 to some maximum value, and squish it into the range of 0 to 1. For vectors, it usually means "make the vector a length of 1", which is mathematically useful if you only care about a vector's direction.
Normal(s) - The direction that a vertex, edge, or face is pointing in. The name is based on the fact that it's a "normalized" vector - it doesn't need a length beyond 1, it just needs to point in a direction. The normals are mainly used to determine how an object is lit and shaded. Normals that are aligned can present a smoother surface, while misaligned normals can show up as hard edges.
Normal Map - A texture containing normal information. Storing this in actual 3D geometry gets really heavy on the computer's memory and processor, so you can pre-calculate it into a 2D texture, called a normal map, and use that instead. The vanilla Sims 4 characters usually export with a normal map alongside them.
Backface - The backside of a face, as determined by its normal direction. Blender typically displays these by default, but games often will not. This is because they represent the inside parts of a model, and should ideally never be seen by the player, so they get hidden (or "culled") to save render time.